Introduction
When it comes to building a professional sports court, the choice of flooring makes all the difference. At Power Court, we specialize in providing high-quality synthetic acrylic sports court flooring that is designed for durability, performance, and versatility. Whether you are planning a tennis court, basketball court, badminton court, or a multi-purpose sports arena, synthetic acrylic flooring remains one of the most trusted solutions worldwide.
The installation of synthetic acrylic sports flooring is not a one-step job. It requires meticulous planning, expert craftsmanship, and precision execution to ensure long-lasting performance. In this guide, we take you through the complete process of sports flooring installation, giving you a clear idea of how professionals like Power Court deliver world-class results.
Why Choose Synthetic Acrylic Sports Court Flooring?
Before we dive into the installation process, it’s important to understand why synthetic acrylic flooring has become the preferred choice for athletes, schools, sports clubs, and recreational centers.
- Durability: Designed to withstand heavy foot traffic and extreme weather.
- Multi-Sport Use: Suitable for tennis, basketball, volleyball, and other sports.
- Customizable: Available in various colors, textures, and performance levels.
- Performance-Oriented: Provides excellent ball bounce, traction, and shock absorption.
- Low Maintenance: Easy to clean and refurbish for long-term use.
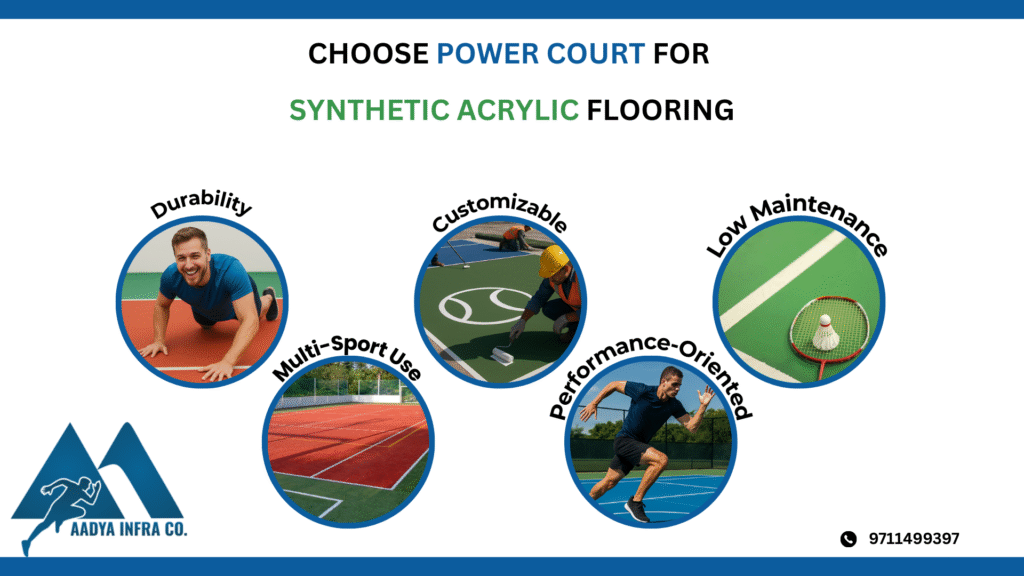
With these benefits, synthetic acrylic flooring has become a gold standard in professional sports flooring installation.
Step 1: Planning and Preparation
Site Assessment
The foundation of a durable sports court lies in its base preparation. At Power Court, our installation team inspects the existing surface for stability, drainage, and environmental suitability. A solid subfloor is essential for ensuring the synthetic acrylic flooring performs at its best.
Court Design and Layout
Every sports facility has unique requirements. We create a detailed court layout including:
- Exact court dimensions based on international standards
- Markings and boundaries for the chosen sport(s)
- Color schemes and customization to reflect your brand or preferences
Our team ensures that the court design meets official sports regulations, making it suitable for both recreational and competitive play.
Materials and Tools Preparation
Having the right materials and tools ensures efficiency and precision during installation.
Materials we use include:
- Multi-layer synthetic acrylic coatings
- High-performance primers and adhesives
- Sealers for weather protection
- Court marking paints and stencils
- Professional cleaning and maintenance products
Tools we use include:
- Measuring tapes and chalk lines
- Rollers, trowels, and leveling equipment
- Utility knives for precision cutting
- Safety gear for worker protection
Step 2: Surface Preparation
A smooth and level subfloor is the foundation of any sports flooring installation. Our team cleans the surface thoroughly, removing debris, dust, and old materials. Cracks and imperfections are repaired to ensure a stable and even base. This guarantees maximum adhesion for the synthetic acrylic layers.
Step 3: Priming and Sealing
To enhance adhesion and prevent moisture issues, a high-quality primer is applied to the subfloor. Once the primer sets, sealers are used to add an extra layer of protection. This step ensures that the synthetic acrylic coatings bond securely and remain resistant to environmental stress.
Step 4: Layout and Cutting
We carefully lay out the synthetic acrylic flooring sheets or coatings according to the approved design. Precise cutting is done around edges, corners, and obstacles to ensure a perfect fit. Accuracy in this stage ensures the court looks professional and plays consistently across the surface.
Step 5: Adhesive Application
Specialized adhesives are applied evenly to the subfloor. To prevent premature drying, our experts work in smaller sections. This step is crucial for long-term performance, as it ensures that the synthetic acrylic flooring layers remain firmly in place.
Step 6: Flooring Installation
The synthetic acrylic flooring is then installed piece by piece, starting from one side and moving across the court. Each layer is pressed firmly and rolled to remove air bubbles and wrinkles. This results in a seamless, smooth, and high-performance sports surface.
Step 7: Court Markings and Finishing Touches
Once the flooring is in place, our specialists apply professional court markings using durable sports paints and stencils. Measurements are double-checked to ensure accuracy according to official regulations. Whether it’s a tennis court, basketball key, or badminton lines, precision is key to professional gameplay.
Step 8: Curing and Final Inspection
After installation, the flooring is allowed to cure under controlled conditions. This curing period ensures the flooring sets properly before it can handle sports activity. Our team conducts a final inspection to guarantee that the surface meets both safety standards and performance expectations.
Post-Installation Care & Maintenance
To maximize the lifespan of your synthetic acrylic sports court flooring, proper care and maintenance are essential. At Power Court Company, we provide clients with a complete maintenance guide, including:
- Regular Cleaning: Remove dust, sweat, and dirt using approved cleaning solutions.
- Periodic Inspections: Identify and fix small issues like cracks or surface wear before they worsen.
- Refurbishment: Depending on usage, resurfacing or recoating may be done to restore playability and extend the flooring’s lifespan.
By following these steps, your synthetic acrylic flooring can last for many years while maintaining peak performance.
Why Choose Power Court for Sports Flooring Installation?
Choosing the right contractor is just as important as choosing the right flooring. Here’s why Power Court stands out:
- Expertise in synthetic acrylic court installation
- Professional team with years of hands-on experience
- High-quality materials for long-lasting results
- Custom solutions for tennis courts, basketball courts, badminton courts, and multi-sport arenas
- Proven track record in indoor and outdoor sports flooring projects
When you partner with us, you’re not just getting a court – you’re getting a world-class sports surface designed for peak performance and durability.
FAQs on Synthetic Acrylic Sports Court Flooring
1. How long does it take to install synthetic acrylic sports court flooring?
Depending on court size, weather, and preparation needs, installation may take anywhere between 5 days to 2 weeks.
2. Is synthetic acrylic flooring suitable for outdoor sports courts?
Yes. At Power Court, we use UV-resistant and weatherproof coatings that make acrylic flooring ideal for outdoor use.
3. How is synthetic acrylic better than other flooring types?
It provides superior shock absorption, consistent ball bounce, durability, and customizable design options, making it a favorite for professional sports.
4. Do I need professional installation?
Yes. Professional installation ensures proper adhesion, accurate court markings, and compliance with safety and sports regulations.
5. How long does synthetic acrylic flooring last?
With proper maintenance, it can last for 8–10 years or more, depending on usage and environmental conditions.
Conclusion
The installation of synthetic acrylic sports court flooring is a multi-step process that requires planning, expertise, and precision. At Power Court, we bring all three together to create professional-grade sports courts that deliver both performance and durability.
Whether you’re building a tennis court, a basketball court, or a multi-purpose sports arena, our team ensures every project meets international standards and exceeds client expectations.
Get in touch with Power Court today to discuss your sports flooring project and transform your vision into a world-class sports facility.